
Learn the steps I took to make a DIY Ugly Christmas sweater using a $10.00 sweatshirt from Walmart and a knitting machine.
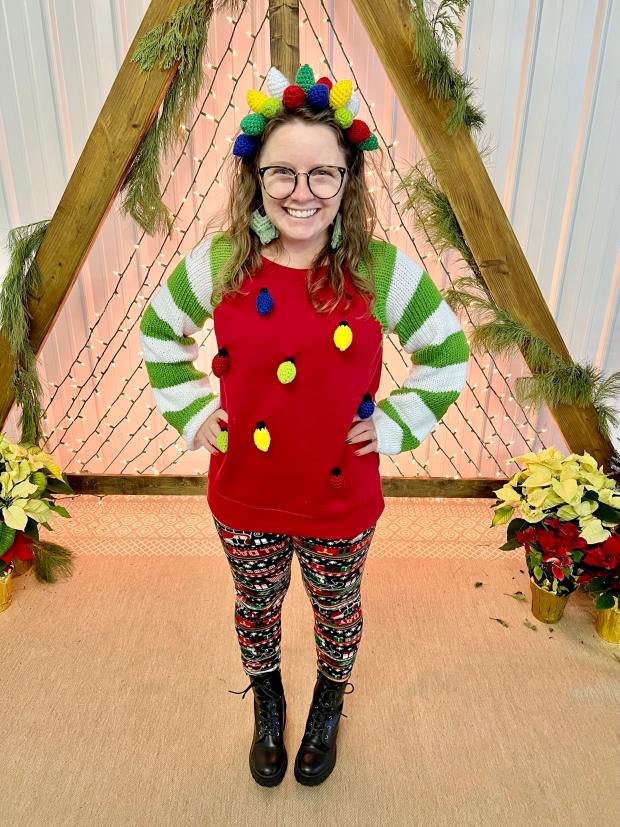
Hey friends! I wanted to share my Ugly Christmas Sweater that I made this year! I made this sweater in about 3 hours, like start to finish (because I, of course, waited until last minute!)

I wanted to walk you through how I made this sweater, and what changes I would make for any future sweaters. Spoiler alert, think October 2023.
You can watch the full explanation on youtube through the link below.
Step 1: Find the Perfect Sweatshirt
The first step was to head to Walmart. I was looking for a solid color sweatshirt, and I wanted it to be raglan style if possible.
I found a solid red sweatshirt for about $10. I got a size medium, not sure if it was men’s or women’s but if you can not find your size be sure to check both the men’s and women’s sections.
This post contains affiliate links meaning I may receive a small commission from purchases made at no extra cost to you.
Step 2: Cut Up Your Sweatshirt
The first thing I did when I got home with my sweatshirt, was cut the arms off! I was very careful not to cut off the seam!

Keeping the seem will make it easier to attach your knitted sleeves later. Cut around the collar as well.
After I cut the sleeves, I knit my new sleeves using my Addi Express King. It’s the Addi knitting machine with 46 needles.

Since I was short on time I thought knitting machine sleeves would be the fastest option.

Step 3: Make Your Sleeves
Using my 46-needle knitting machine, I started with waste yarn, then added my first color. I did 12 rows for each color block. I used green and white, for a grand total of 120 rows for one sleeve.

If you want yours longer be sure to do more than 120 rows, or if you want them shorter do less. 🙂
I repeated this for my other sleeve because I wanted them to match!
Ideas:
- You could make it “uglier” by making each sleeve different.
- You could leave one sleeve on from the original sweatshirt, and knit one new sleeve.
- You could do a half-and-half sweater, where one side is the original sweater and the other is all DIY.
Once I got my 120 rows, I ended with more waste yarn and fastened off my machine.
To finish my sleeve with my waste yarn still attached, I used my size H hook and pulled up a loop from my last row of white.
I grabbed the second loop of white and pulled it through the first loop.


I did that all the way around and tied off with my tail, and weaved in all my tails.
Attaching Sleeves
Now we need to prep our sweatshirt around the armholes that we just cut.
I tried to use the blanket stitch.
That is where you a giant piece of yarn and a tapestry needle to make the stitch all the way around to give yourself a place to attach your sleeve to. Sadly that was a DISASTER!
So no blanket stitch for me! I ended up crocheting around my sweatshirt armhole.
I started with a small 2.5mm metal crochet hook to go through the fabric and single crocheting along the armhole. I ended up trying my D Clover Amour hook and it worked great!

It did get a little hard to get my hook through the thick collar area, so I used a small pair of sewing scissors to create small holes big enough for my crochet hook to go through.
Disclaimer: This probably isn’t safe and you could probably really hurt yourself. Have an adult help you if you’re a child and you’re reading this.

Since I was in a hurry, I did not “math out” how many single crochet stitches I should have around the armhole opening.
For my future sweater, I would math out to be 2 times the amount of sleeve stitches I have. For example, here I had 46 stitches for my sleeve, so I would create 92 single crochets around my arm opening.

To attach my knit sleeve to my store-bought sweater, I used my H hook. I had 80 single crochet stitches around my armhole, and 46 stitches around my sleeve opening. It wasn’t perfect, but it was okay!

Decorations
After I attached both of my sleeves it was time to decorate!
My first thought was to make a long green tube using my Tulip I-Cord Maker and I create a zig-zag Christmas tree on the front of my sweater.


Turns out, that idea kinda looked like a snake. So I decided to go a different route and attach crochet Christmas lights!

I attached these lights at random while my husband was driving us in the car, using a tapestry needle and black yarn.
I love that the lights were dangly, it made the sweater that much more fun.
Sleeve Cuffs
Lastly, I wanted to add a cuff to my sleeves! Sadly, I ran out of time!! So at the Christmas party, my sleeves had that rolled look, which isn’t bad.
I still wanted to try the cuffs that I had in mind, so after the party when I had a little time I added a crocheted cuff to one sleeve to share with you!

To make the cuff I used a H hook, and Single Crocheted around the bottom of the 46 stitches of the bottom of the sleeve.
Then I chained 9, and single crocheted 8 back down the chain.
Joined to the body of my sleeve, and single crochet in the back loop going back up.
Ch 1, turn. Single Crochet in the back loop only going back down.

I did this all the way around, making sure to have 1 row of coffee for each stitch of sleeve.
So since I had 46 stitches, I had 46 single crochet rows.
I like the finished look of the cuff, but If I were to redo it I would use my Clover Amour G hook so the cuff is a little tighter.
I ended up being in the top 3 finalists for the Christmas Sweater Challenge we had! It was super fun, and we had a great time!

I really enjoyed making this ugly Christmas sweater! I have been wanting to make knitting machine sweater sleeves for years!!
I hope you enjoyed the breakdown of how I made my “Ugly” Christmas Sweater! Don’t forget your freebie before you leave! I hope you have an amazing day.
❤️ Ashley
