Follow this beginner crochet cow pattern and learn how to make the easiest amigurumi cow ever! Complete with a full video tutorial.
Hello, my fellow crochet addicted yarn enthusiast! Welcome to A Crafty Concept!
If you are new around here let me introduce myself. My name is Ashley and I help crocheters start and grow crochet business by providing free crochet patterns with the intention to sell the finished piece.
I often include freebies with my patterns to make marketing them to your audience easier such as handmade with love wrap labels I send out every week, adoption certificate PDFs, Care Tag PDFs, Marketing tips sheets, and more.
Speaking of freebies, this crochet cow pattern also has a sweet freebie I designed specifically for this cow!

Don’t forget your freebie! Sign up to my email list and you’ll receive the Mia Moo Moo Adoption Certificate absolutely free, and start receiving other handy freebies from me every week!
This post may contain affiliate links meaning I may receive a small commission from purchases made at no extra cost to you.
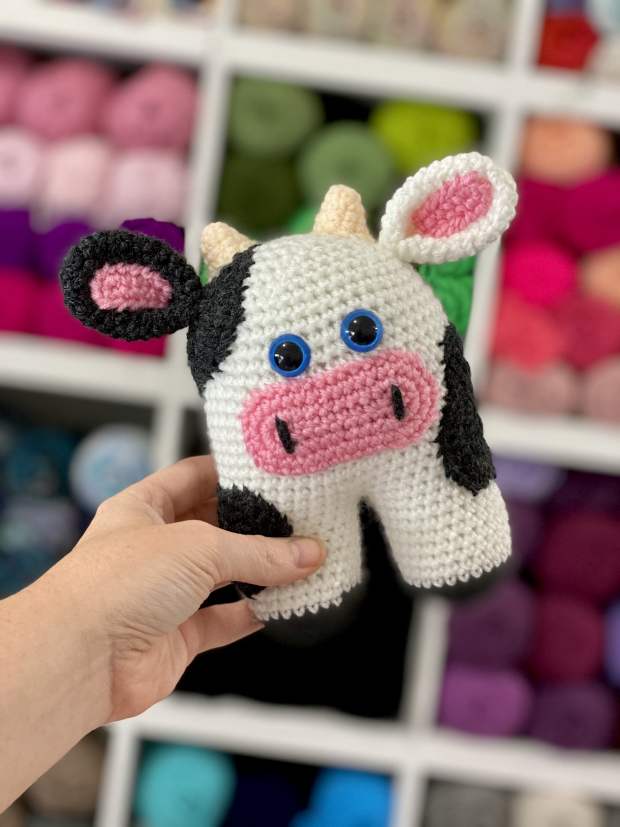
Today I have something UDDERLY fantastic for you guys! This is the Mia Moo Moo, the newest edition to the Crafty Friends family.

Named after the customer that bought the first Mia Moo Moo from my Etsy shop back in 2016, this crochet cow pattern is on my list of favorite stuffy designs of all time.

If you want the ad-free PDF download for this pattern you can grab it through the link below in my shop for only $3.00

The video that goes with this pattern is for all the “cow bits” but if you need to watch a video for the body you can check out the Ava Bunny video! The cow body is exactly like the bunny body.
After you finish your cow body, stuffed, eyes the whole thing, you can watch the video that goes with THIS pattern to see how to make an attach all the cow bits.
Here’s what you will need to make your own crochet cow amigurumi
Materials
– Size F or 3.75mm crochet hook
– We Crochet Brava yarn in the colors White, Asphalt Heather, and Cotton Candy. Also a tiny bit of cream color worsted weight yarn.
– Tapestry Needle
– Scissors
– Polyfill
– 12mm Safety Eyes
– Sewing Pins
*I have linked most of the supplies I used in the materials section above.
STITCH KEY (US TERMS)
CH- Chain
SC- Single Crochet
INC- Increase (in this case- 2 SC in the same stitch)
DEC- Decrease, in this case, invisible decrease (explained below)
SLST- Slip Stitch
DC- Double Crochet
HDC- Half Double Crochet
* To be repeated
SPECIAL STITCHES
- Magic Circle –We will be using the Magic Circle method for this crochet cow pattern. If you are unfamiliar with this technique I will link a good YouTube video for you here.
- Invisible Decrease – invisible single crochet decrease – insert hook into front loop of next stitch, then insert your hook into the front loop of the following stitch (3 loops on hook). Yarn over and draw through 2 loops (2 loops on hook), yarn over and pull through 2 remaining loops on hook.
- Continuous Rounds – This pattern is worked in continuous rounds without joining. After you finish the stitches of one round, start right on the next without joining between. I find it handy to use a stitch marker (or a piece of yarn) to mark the start of each round so you know when each round starts/ends.
- Color Changes – change colors at the end of the round. Complete last single crochet of the round until the last yarn over. Yarn over with new color and pull through last step of the single crochet. So your single crochet will go like this: insert hook into last stitch, pull up a loop, yarn over with new color, pull through both loops on hook.
Before You Start- Important
If you do plan on selling these cuties in your shop (either online or at markets), And I hope you do, I would include a warning that it is made with small pieces, and children under 3 should be supervised when playing with them.
The safety eyes are in there REALLY GOOD and they’re super hard to pull apart after you snap them shut, but it’s better to be safe than sorry.
Crochet Cow Pattern

Starting with your first leg and using your Asphalt Heather yarn
Round 1: SC 6 into magic circle (6)
Round 2: INC in each stitch around (12)
Round 3: INC, SC* around 6 times (18)
Round 4: INC, SC, SC* around 6 times (24)
Rounds 5: SC in each stitch around (24)
Switch to white yarn when completing the 24th SC.
Using your white yarn
Rounds 6-13: SC in each stitch around (24)
SLST into the next space and tie off.

Repeat rounds 1-13 for your second leg, but do not cut your yarn and tie off.
Sew in your tails you made when starting each foot.
We are going to start Round 14 working on the second leg- this will be the first round of our crochet cow body.
Round 14: SC 24
Grab your first leg and place a SLST in the SLST from where you tied off in Round 13 of leg 1.
SC in the same space where you SLST to tie off Round 13 from leg 1.
So you are slip stitching into a slip stitch- then putting a single crochet into the same space where the original slip stitch was. If this is confusing please refer to 22-minute mark in the Ava Bunny video.


This is the best way I could get it where there wasn’t a hole between the two legs that would have to be stitched closed. If you prefer to stitch up a small hole that’s totally fine. The main thing is round 14 has 48 stitches total, 24sc for the first leg and 24sc for the second leg.
SC 23 more times around the leg. (48 stitches total in Round 14)
SLST into the same space as your 24th sc from Round 13 on leg 2. Non of the slip stitches count as a stitch, they’re just creating the desired shape of our cow.
Round 15-31: SC around (48)
Before we start our decreases we’re gonna do a few things. Pull up a big loop from your working yarn so you don’t accidentally pull out any stitches.
Sew in all your tails using a tapestry needle. (I show how I do this on the Ava Bunny video if you need a visual)
Stuff the bottom half of your cow with polyfill.
Position the Eyes centered on the face and between Rounds 27 and 28. I usually have about 3 stitches between my eyes.
Ok back to our crochet cow pattern!

Insert your hook back into the loop you left up and begin Round 32.
Round 32: SC 6, DEC* around 6 times (42) – I prefer the invisible decrease method here for a cleaner look.
Round 33: SC 5, DEC* around 6 times (36)
Round 34: SC 4, DEC* around 6 times (30)
Round 35: SC 3, DEC* around 6 times (24)
Finish stuffing your cow amigurumi.
Round 36: SC 2, DEC* around 6 times (18)
Add any more stuffing if necessary.
Round 37: SC 1, DEC* around 6 times (12)
Round 38: DEC around 6 times (6) Cut your yarn leaving a long tail for sewing.
Thread your tail onto a tapestry needle and close the top of your cow by picking up the front loop of every stitch and pulling your tail through all the loops. (I show how to do this in the Ava Bunny video)
Finish sewing in your tail.

Time to make all the cow bits in this crochet cow pattern!
Snout– Using your Cotton Candy yarn
Chain 8
Row 1: Skip the chain closest to your hook and SC 3 in the next stitch. SC one time in the next 5 stitches.
SC 6 in the last stitch. SC 5 back up the other side of your chain. SC 3 in the last stitch.
Join into the top of your first SC, CH 1. (22)
Row 2: SC INC in the first 3 stitches. SC in the next 5 stitches. SC INC in the next 6 stitches (around the end). SC in the next 5 stitches. SC INC in the last 3 stitches. Join into the top of the first SC. (34)
Row 3: SC in the first stitch, INC in the next* Repeat that 2 more times. SC in the next 5 stitches.
SC in the next stitch, INC in the next* Repeat that 4 more times. SC in the next 5 stitches.
SC in the next stitch, INC in the next* Repeat that 2 more times. Join into the top of the first SC. (46)
Tie off leaving a long tail for attaching your snout onto your cow body.
Stitch on the nose holes with your Asphalt Heather yarn and a tapestry needle.

Ears
Make one ear White and one ear Asphalt Heather
The Ears are made in a continuous round.
Round 1: SC 6 into a magic circle (6)
Round 2: INC in each stitch around (12)
Round 3: INC, SC* around (18)
Rounds 4-12: SC in each stitch (18)
Tie off leaving a long tail for attaching. Sew in your tail from round 1.

Inner Ear – Make 2
Using the Cotten Candy yarn
CH 6
Skip the chain closest to your hook and SC in each of the next 4 stitches.
SC 6 in the last chain space
SC 4 back up the other side of your starting chain.
Tie off leaving a long tail for sewing onto your larger ear piece.
Sew your inner ear pieces onto your big ear pieces using your tapestry needle and the whip stitch.


Horns– Make 2
The horns are made in a continuous round.
Using your cream yarn
Round 1: Sc 6 into a magic circle (6)
Round 2: INC, SC 5 (7)
Round 3: SC 3, INC, SC 3 (8)
Round 4: SC 5, INC, SC 2 (9)
Round 5: INC, SC 8 (10)
Tie off leaving a long tail for attaching to your cow.

Big Patches – Make 2
The patches are a little funky to give it that “organic” look so just take it slow and bare with me. If you need extra help skip to the 24:30 mark in the video that goes with THIS pattern.
Using your Asphalt Heather yarn
Round 1: SC 7 into a magic circle (7)
This next round is created by increasing in every stitch around, but it’s tricky because it’s not two of the same stitches. Each stitch combo between commas goes into a single stitch together.
Round 2: SC-HDC, DC-DC, HDC-SC, HDC-DC, DC-DC, DC-HDC, HDC-SC (14)
For round 3 we will be doing the same thing. The stitch combos between the commas go into the same stitch together. Not all the stitches in round 3 are increase stitches though so be mindful of that when you are reading the instructions.
Round 3: SC-SC, HDC, DC-DC, DC, HDC-SC, SC, HDC-DC, DC, DC-HDC, SC, SC-HDC, DC, DC-DC, HDC (21)
Ok one more round and you’re golden.
Round 4: SC-SC, SC, HDC, HDC-DC, DC-DC, HDC-SC, SC, SC-HDC, DC-DC, DC, DC-DC, HDC-SC, SC, HDC-DC, DC-DC, HDC-SC, HDC, DC-DC, DC, DC-HDC, SC (34)
Tie off and leave a long tail for attaching onto your cow body.
Sew in your first tail.
Small Patch- Make 1

Repeat rounds 1-3 of the big spot but stop after round 3.
Tie off and leave a long tail for attaching onto your cow body.
Sew in your first tail.
How to assemble your crochet cow
I like to start with the snout.
Pin it in the center of your cow’s face, just below the eyes.

Whipstitch the snout onto the body using a tapestry needle.
Tie off and sew in your tail.

Next up, the patches.
I like to pin one big patch on the left side of the head, and one centered on the right side of the cow and the small patch just above his left “hoof”.
Use your pins to hold down one patch at a time while you whip stitch it with a tapestry needle.

Tie off and sew in your tail.
Repeat for all 3 patches.
Time for the Ears.
Fold each year in half, hot dog style, and sew them onto the sides of your cow’s head. I like to use pins to line up where the front and back ends of each ear will go.
Sew them on by going into the body of the cow then into the opposite side of the ear. Back into the body of the cow, back through the opposite side of the ear and so on and so forth until your ear is attached.
Do this for both ears.

Last but not least the horns.
Use your hears to help you line up where the horns should go. I use one pin on each horn to hold it in place, while still allowing me to adjust it as I go.
After you whip stitch a few times, stuff your horns with a tiny bit of poly-filL, then continue to whip stitch it to your cow head.

Tie off and sew in your tails and you’re all finished!!
How much do you love this little guy? I can’t help but give him a quick *BOOP* after I make one.
I hope you guys love this crochet cow pattern!
If you plan on selling these cuties (and I hope you do), be sure to grab the freebie before you go. Its a PDF download of an adoption certificate your customers can fill out after buying their new a-moooo-zing new friend.
If you share any pics of your Mia Moo Moo on social media be sure to tag me @ACraftyConcept. There’s nothing I love more than seeing all you talented crochet folk working up my designs!
That’s all I have for now friends. Happy Crocheting!
❤️ Ashley