Some of the links in this post may be affiliate links, meaning I may receive a small commission, at NO ADDITIONAL cost to you, from purchases made using the links provided.

I am so happy fall is finally here! It is for sure my favorite time of year, not too hot, not too cold, and BEANIE SEASON is in full swing ???? Another thing that makes fall so great, is all the fall decorations, especially the PUMPKINS!
I was recently going through my daughter’s old baby onesies and got inspired and knew I had to share this fun tutorial with you guys! I have a hard time letting go of Ava’s baby clothes (she’s 2 and a half now). I have a tote full of “baby quilt” clothes I’m going to make one day, but these cute Baby Onesie Pumpkins are another great way I can reuse her old clothes and look at them every year 😀
Full disclosure, you do not have to use a baby onesie. You could use an old t-shirt or a pair of pants or even a cute crewneck sweater (that would make an adorable pumpkin), You would still follow these same directions ☺

Here is what you will need to make these pumpkins
– Baby Onesie
– Poly Fill (or yarn scraps if you want to make this project REALLY recycled!)
– Scissors
– Embroidery Thread
– Yarn
– Yarn Tapestry Needle (big enough for your yarn to go through)
– Embroidery Needle
– Hot glue gun and sticks
– Stick
First, you want to lay out your baby onesie and cut just under the armpits, and just above the butt. This will create a tube out of the torso of the onesie and that is the part we will be using to make our pumpkin. Flip your tube inside out.


Cut a piece of embroidery thread about 12-18 inches long. It’s better to cut it too long than too short.
Thread your embroidery needle with your embroidery thread and begin doing a running stitch around the bottom of your tube, about 1/4 inch from the top. Be careful to leave a long tail for tying and don’t let it pull through your stitches.
TIP: A running stitch is just fancy talk for pushing your needle in and out of the fabric. Here is a quick video if you’re a visual learner.


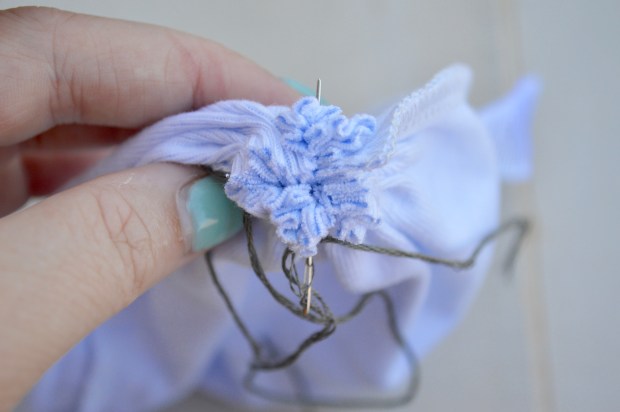
Gather all the fabric and tie a knot. I like to run my needle through the hole a few times, in a few different directions, then knot it again, to ensure it stays closed and no stuffing will poke out.


Not flip your pumpkin right side out and repeat the running stitch around the top of the tube.


Before you gather your fabric along the running stitch, stuff your pumpkin with your polyfill. (this is a great place to recycle scrap yarn if you have it on hand)

Gather your fabric and tie a knot just like before. Then secure by running a few stitches through the hole in a couple different directions. I won’t lie this part is very difficult for me, you might need someone to hold your pumpkin closed so the top hole will be as tight as possible. Remember if there is an opening your stuffing could pop out.


Cut a long piece of yarn (about 3 feet), again, longer is better. Thread it onto your tapestry needle.

Push your needle from the bottom of your pumpkin (not directly in the hole made from bunching the fabric, go a little on the outside of that hole) and out the top. Be sure to leave a tail for tying. Go over the bunched fabric on top, and insert your needle on the other side of the hole and push back through to the bottom. Tie a knot as tight as you can to squeeze the top and bottoms of the pumpkin together.


This is the top of your pumpkin now
Now we are going to create our pumpkins sections. Poke your needle through the bottom of the pumpkin (again not directly in your hole from the bunches fabric, just outside of it) back out the top, wrap your yarn around the outside body of the pumpkin and back into the bottom, and out the top. Pull taut. This will create the “sections” in your pumpkin. Repeat all the way around your pumpkin until you get your desired amount of sections. Remember they do not have to all be the same size, pumpkins aren’t perfect.


When you are back to the beginning, tie a knot with your original yarn tail and cut your yarn.

Time to attach your stem, aka your stick. Mine is about half an inch thick and 1.5 inches tall.
Squeeze a big dob of hot glue in the center of the side of the pumpkin you want to be the top. Hold your stick stem on the hot glue dob for a few seconds, while pushing down into the pumpkin.

TADA!!!! A super cute, trendy and possibly sentimental fabric pumpkin!! You can go crazy with embellishments if you would like to add some extra pizzaz to your pumpkin. These little guys are so stinking cute, and pretty addictive lol. I have posted some pics below of other before and after pumpkins I made from different types of clothing!
Quick tip: If your tube is more of a square shape vs a rectangle your pumpkin will be more proportional ????????

I hope you guys enjoyed this tutorial! Please tag me @ACraftyConcept in any pictures you post of pumpkins you made using this tutorial. I would LOVE to see your take on these adorable fabric pumpkins!
Happy Punkin’ Makin’
❤Ashley


