
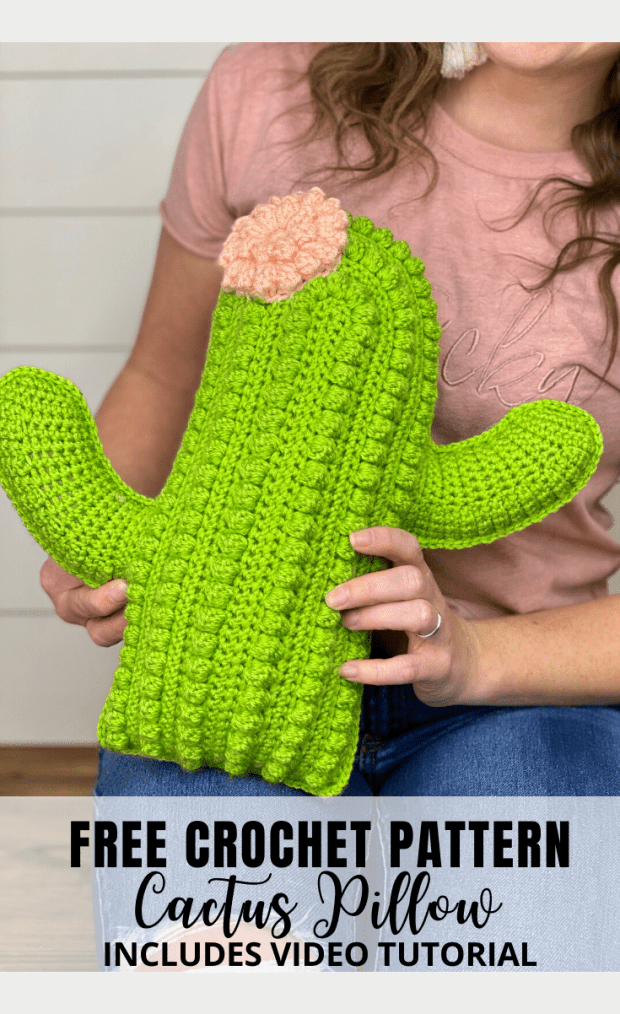
Learn how to make this adorable crochet cactus pillow. The full tutorial is absolutely free and includes video instructions!
Don’t you just love an easy crochet pattern that doesn’t have to “fit”? I think that’s why home decor pieces are one of my favorite things to crochet. I don’t have to math out multiple sizes, I don’t have to make a perfect gauge swatch, and I don’t have to worry about the recipient saying their piece is too big or too small.
Bring on the “one-size” crochet patterns.
This crochet cactus pillow is a special crochet pattern because it was one of the first crochet patterns I ever designed, back in summer 2017.
Introducing the Crafty Cactus Pillow

You can purchase the ad-free PDF pattern here.

Watch the full video tutorial here.
One more thing before we get into the good bits! If you plan on selling your finished crochet cactus pillows (and I hope you do!) you can sign up to my email list here and recieve a free PDF of cactus pillow selling tips to help you get started!

Don’t forget your freebie! Sign up to my email list and you’ll receive the Crafty Cactus Pillow Marketing tips sheet absolutely free, and start receiving other handy freebies from me every week!
Crochet Cactus Pillow Pattern
Materials (with clickable affiliate links)
– G (4mm) Crochet Hook
– 1 skein of worsted weight yarn. I used “I Love This Yarn” from Hobby Lobby in the color Key Lime.
– Polyfill
– Scissors
Stitch Key (US Terms)
SC = Single Crochet
CH = Chain
INC= Increase (Put two stitches in the same space. In this case it will be two SC stitches.)
DEC=Decrease (Insert hook into stitch, pull up a loop, insert hook into next stitch, pull up a loop, yarn over and pull through all 3 loops)
SL ST= Slip Stitch
*= To Be Repeated
Special Stitches
Back Bump: This is where you flip your starting chain over and insert your hook into the “back bump” of the chain and place your stitch there. If you are unfamiliar with this technique I would suggest watching the video that goes with this pattern.
Bobble stitch: *yarn over, insert hook into stitch and pull up a loop, yarn over and pull through 2 loops on your hook* Repeat 3 more times. Now you should have 5 loops on your hook. Yarn over and pull through all 5 loops on your hook. (do not chain after this, just go straight into your next stitch)
Finished Dimensions: About 14″ tall and 14″ wide (arm to arm)
Gauge: Not necessary for this pattern (thank ya, Jesus)
Body: Front Piece
Make a slip knot and CH 42
Row 1: Skip the chain closes to your hook and SC 40 in the “back bump” of the chain.

SC 6 in the last chain then SC 40 back down the other side of the starting chain. CH 1, turn. (86)

TIP: If you do not know how to crochet into the back bump of a chain please refer to the video that goes with this pattern

Row 2: SC 40, INC in the next 6 stitches, SC 40. CH 1, turn. (92)

Row 3: SC, BOBBLE* around ending with SC, SC (making the last bobble stitch a SC instead so were not ending on a bobble.) CH 1, turn. (92)

Row 4: SC 40, *INC in the next stitch, SC in the next stitch* 6 times. SC 40. CH 1, turn. (98)

Row 5: SC 98. CH 1, turn. (98)

Row 6: SC 40, *SC in the next 2 stitches, INC in the next stitch* 6 times. SC 40. CH 1, turn. (104)
Row 7: SC in the first stitch. *SC, BOBBLE* around ending on a SC stitch (104)

Row 8: SC 40, *INC in the next stitch, SC in the next 3 stitches* 6 times. SC 40. CH 1, turn. (110)

Row 9: SC 110. CH 1, turn. (110)

Row 10: SC 40, *SC in the next 4 stitches, INC in the next stitch* 6 times. SC 40. CH 1, turn (116)

Row 11: SC, BOBBLE* around ending with SC, SC (making the last bobble stitch a SC instead so were not ending on a bobble.) CH 1, turn. (116)

Row 12: SC 40, *INC in the next stitch, SC in the next 5 stitches* 6 times. SC 40. CH 1, turn (122)
Row 13: SC 122. Tie off and sew in loose ends.

Body: Back Piece

Make a slip knot and CH 42
Row 1: Skip the chain closes to your hook and SC 40 in the “back bump” of the chain. SC 6 in the last chain then SC 40 back down the other side of the starting chain. CH 1, turn. (86)
TIP: If you do not know how to crochet into the back bump of a chain please refer to the video that goes with this pattern
Row 2: SC 40, INC in the next 6 stitches, SC 40. CH 1, turn. (92)
Row 3: SC 92 (no increases in this row. I call this a “grow row” ) CH 1, turn. (92)
Row 4: SC 40, *INC in the next stitch, SC in the next stitch* 6 times. SC 40. CH 1, turn. (98)
Row 5: SC 98. CH 1, turn. (98)
Row 6: SC 40, *SC in the next 2 stitches, INC in the next stitch* 6 times. SC 40. CH 1, turn. (104)
Row 7: SC 104. CH 1, turn. (104)
Row 8: SC 40, *INC in the next stitch, SC in the next 3 stitches* 6 times. SC 40. CH 1, turn. (110)
Row 9: SC 110. CH 1, turn. (110)
Row 10: SC 40, *SC in the next 4 stitches, INC in the next stitch* 6 times. SC 40. CH 1, turn (116)
Row 11: SC 116. CH 1, turn (116)
Row 12: SC 40, *INC in the next stitch, SC in the next 5 stitches* 6 times. SC 40. CH 1, turn (122)
Row 13: SC 122. Tie off and sew in loose ends.
Right Arm: Do the same on both body pieces.
Pay very close attention to the instructions on the arms, they’re a little unique. If you have trouble please refer to the 28:00 mark in the video that goes with this pattern.
Attach yarn in the 25th chain from the bottom (right side facing), on the right side of the cactus. CH 1
Row 1: Sc in the same chain where you just joined. SC 3. Now you have 4 SC. Turn work (do not CH up)


SC 4, CH 1 and turn,


SC 4, now insert your hook back into the body of the cactus for your 5th SC and SC 6 more times for a total of 11 SC. CH 1, turn.


Row 2: SC 11, CH 1 turn.

Rows 3-14: Repeat rows 1 and 2. (This time you will put the weird 5th SC into the previous row instead of the body of the cactus pillow.)


Row 15: DEC, SC 7, DEC (9)
Row 16: DEC, SC 5, DEC (7)
Row 17: DEC, SC 3, DEC (5)
Tie off and sew in loose end.

Left Arm: Do the same on both body pieces.
Attach yarn in the 14th chain from the bottom (wrong side facing), on the left side of the cactus. CH 1
Repeat rows 1-17 from the Right Arm.
Flower: I used the Popcorn Stitch Flower pattern by BHooked. She has a lot of different free flower patterns on her blog and youtube channel!


Assembly
Place both pieces of the Cactus Pillow together, right sides facing out. (the right side of the front piece is the side where the bobbles poke out) Reattach yarn in the bottom right corner and CH 1.


SC all the way around the pillow making sure all the stitches line up.


When you get to the Arms, you will have to make your own places to put your hook, but as long as they are the same for the front and back pieces of the pillow it will look great.
Tip: I like to put 2 SC in each corner of the cactus to give it a nice rounded look. So this will be both corners in the arms and the two corners at the base of the Cactus.

Once you get to the bottom left corner stuff your pillow with some Polyfill.

Then close up the bottom of the pillow with SC until you are back to the beginning. Tie off and sew in your loose ends.


Attach your flower and you’re all finished!

I hope you guys love this pattern! If you post any pics I would love to see! You can tag me @ACraftyConcept on social media and I’ll see it. For those of you who plan on selling your finished pillows, I hope the Marketing Tips Freebie is helpful and gives you some creative marketing juice to get you started!
Happy Crocheting
❤️Ashley