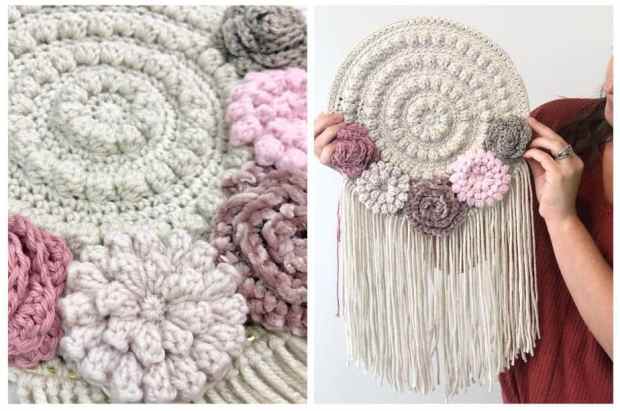
This easy crochet tapestry works up super fast, is the perfect stash-busting project, and would bring more attention to your booth at your next market

I am so happy with how this crochet tapestry turned out! This pattern was designed after my Crafty Boho Pillow pattern (there’s also a matching Crafty Boho Rug pattern!)
Some of the links in this post may be affiliate links, meaning I may receive a small commission, at NO ADDITIONAL cost to you, from purchases made using the links provided.

I have made this pattern available for free here on my blog, but if you would like a printable PDF version you can get it HERE in my Etsy shop or HERE in my Ravelry shop for only $3.00.

Crafty Boho Flower Wall Hanger
Finished Dimensions: 10” in diameter (not including fringe length).
Materials: (with affiliate links)
– Size H (5.0mm) crochet hook
– 4-5oz of Linen worsted weight yarn (I use Hobby Lobby’s I Love This Yarn)
– 10″ Metal Ring (You can buy a 6-pack here if you plan on making a bunch!)
– Tapestry needle
– Miscellaneous yarn and hooks for flowers

Stitch Key (US Terms)
SC = Single Crochet
CH = Chain
YO= Yarn Over
INC= Increase – Put two stitches in the same space. (In this case, it will be two SC stitches.)
SL ST= Slip Stitch
*= To Be Repeated
Special Stitches
Bobble: *YO, Insert hook into stitch and pull up a loop, YO and pull through 2 loops on your hook* Repeat 3 more times. Now you should have 5 loops on your hook. YO and pull through all 5 loops on your hook. (do not chain after this, just go straight into your next stitch).
Magic Circle: If you are unfamiliar with the Magic Circle/Ring method you are welcome to chain 3, join, and crochet in the circle you created. If you would like to learn how to crochet the Magic Circle here is an awesome video tutorial.
DISCLAIMER
All these pics were taken using a size G hook, but the pattern calls for a size H. I didn’t want to have to retake ALL these photos just because the hook size was different
Body
With Linen yarn
Row 1: SC 10 into a Magic Circle. Join back into the first SC, CH 1. (10)


Row 2: INC in each stitch around. Join back into the first SC, CH 1, turn.(20)


Row 3: *BOBBLE, SC* around. Join into the top of the first stitch (a Bobble stitch), CH 1, turn. (20)


Row 4: *INC, SC* around. Join back into the first SC, CH 1. (30)

Row 5: SC 30. Join back into the first SC, CH 1. (30)

Row 6: *INC, SC 2* around. Join back into the first SC, CH 1, turn (40)

Row 7: *BOBBLE, SC* around. Join back into the first SC, CH 1, turn. (40)


Row 8: *INC, SC 3* around. Join back into the first SC, CH 1. (50)

Row 9: SC 50. Join back into the first SC, CH 1. (50)

Row 10: *INC, SC 4* around. Join back into the first SC, CH 1, turn (60)

Row 11: *BOBBLE, SC* around. Join back into the first SC, CH 1, turn. (60)


Row 12: *INC, SC 5* around. Join back into the first SC, CH 1. (70)

Row 13: SC 70. Join back into the first SC, CH 1. (70)

Row 14: *INC, SC 6* around. Join back into the first SC, CH 1, turn (80)

Row 15: *BOBBLE, SC* around. Join back into the first SC, CH 1, turn. (80)


Row 16: *INC, SC 7* around. Join back into the first SC, CH 1. (90)

Row 17: SC 90. Join back into the first SC, CH 1. (90)

For row 18, we will be working around our metal ring. Here is a video if you are a visual learner like myself.
Tip: if you cant see the video player below, you may need to pause your ad-blocker if you are using one.
Row 18: *INC, SC 8* around. Join back into the first SC, CH 1. (100)
Sew in your tails.
The good thing about this crochet tapestry pattern is you can use any hook, yarn or flower pattern to create your flowers to go on the bottom. You can use as many or as little flowers as you would like; it’s totally up to you.
Here is how I made and attached my flowers.
Popcorn Flower (make 2)
This flower pattern is by the lovely Brittany of B. Hooked crochet. You can find it for free on her blog here.
Rose #1- Swirly Rose
This rose is super simple to make. You can adjust the size by changing hook sizes, yarn weights and by adding/subtracting rows.
I made a quick video showing how I make these Swirly Rose Flowers.
It is made in the round so you may need a stitch marker.
Round 1: SC 6 into a magic circle
Round 2: Starting in the top of the first SC from Round 1, INC in each stitch around, BACK LOOP ONLY (12)
Round 3: Starting in the top of the first SC from R
Round 4: Starting in the top of the first stitch from Round 3, *INC, SC, SC* around in the back loop only (24)
TIP: If you want to keep adding rows, round 5 would say *INC, SC, SC, SC* around in the back loop only (30), round 6 would say *INC, SC, SC, SC, SC* and so on.
Chain 1 and turn your work.
*SC, SC, SC, INC* around in the exposed front loops, all the way to the center of the rose. Tie off, leaving a long tail for sewing your rose onto your wall hanging.
Pull your tail to the back of the rose and set it aside until you are ready to attach it to your wall hanging.
Rose #2- Scallop Rose (make 2)
With the yarn of your choosing, and appropriate hook,
CH a multiple of 6, then add one more CH to the end for turning. (multiple of 6 + 1)
For my flower I am using I Love This Yarn in the color Gray Mist , and a Clover amour size 5.0mm Hook. I chained 37 (36 is the multiple of 6 then add 1 to make 37).
Skip the chain closest to your hook, INC (2 SC in the same stitch) in every CH down. CH 1, turn. (72)
*Skip the first two stitches, 5 DC in the next stitch. Skip the next two stitches, SL ST in the next stitch. Repeat from * all the way down the row.
My flower has 12 scallops (or 5 DC clusters) .
Leave a very long tail for shaping our rose and attaching to the body of the piece.
Thread your long tail onto a tapestry needle. With the wrong side facing (so your scallops should look like they are curling away from you), begin to roll your flower into itself, and stitch it closed as you roll.
Your stitches should go all the way across the base of the flower, going through lots of stitches along the way.
I find it easier to look at it from the bottom as I roll and stitch.
This is hard for me to explain in the written word, so I included a quick video for this flower too.
Attaching your flowers
After you make all of your flowers, line them up onto your crochet tapestry and decide which order you want them to go in.
Keep in mind you will still need to attach your fringe into each stitch across the bottom of your tapestry.
Starting near the center, and working your way out, attach each flower to the body of your crochet tapestry.
Here is where I use the tails that were left after making each flower. I pull both tails down into the body of the tapestry, thread the longest tail onto my tapestry needle, and secure each flower down with a few stitches.
Tie the two tails of the flower together in a knot, then sew them into the body of the wall hanging.
Repeat for all flowers.
Fringe
Originally, when I first made this design, I attached the fringe before the flowers, but I had issues with centering the flowers because of the fringe.
Adding the fringe after the flowers
Decide how long you want your fringe to hang down from the bottom of your crochet tapestry, and double it.
Mine fringe hangs down about 11.5 inches. So each piece of yarn is about 23″ long.
Pro Tip: Cutting fringe is easier if you use a template, wrap your yarn around and around your template, then cut all the fringe at once. I used a book for my fringe.
Attach fringe pieces in each stitch across the bottom of your wall hanging.
For a fuller look, I attached one fringe piece in the first stitch, then two fringe pieces in the second stitch and repeated that across the bottom.
My fringe was across 35 stitches.
To attach fringe, fold your fringe yarn in half, insert your hook into the stitch from the back of your wall hanging, grab the center of the fringe yarn (where its folded) and pull it through the stitch (this creates a loop on your hook).
Grab the fringe yarn with your hook and pull it through the loop. Repeat as desired.
Now take a step back and look at your beautiful piece of wall decor you created!! I think these wall hangings are stunning and would look so pretty in any room in a house.

These inexpensive hooks are PERFECT for hanging your crochet tapestry on!
I love how versatile the design is. You could get creative with different flower patterns, color combos, yarns, and textures and make each Crafty Boho Wall Hanger unique.
If you loved this design be sure to check out the Unicorn Wall Hanger pattern.

I hope you guys love this pattern. If you make any wall hangings and post pics, please tag me @ACraftyConcept, I would love to see your finished piece! I’m excited to see everyone’s unique style shine through with this design.
Happy Crocheting
❤️Ashley