
I have been crocheting since I was about 10 years old. My Mamaw taught me how to crochet a chain and that’s what I did, crocheted million foot long chains, all day long. Eventually, she taught me the double crochet stitch, then after that everything else I learned was basically from youtube and books (yes actual paper books I bought at an actual bookstore). I feel like every time I see a new technique or a new way of doing things, I’m immediately like “the way I do it is fine”, and I won’t give it any more thought until months (or sometimes years) later. Then when I take the time to learn the new technique I am BLOWN AWAY!! ” Why didn’t I do this sooner?!”
Some of the links in this post may be affiliate links, meaning I may receive a small commission, at NO ADDITIONAL cost to you, from purchases made using the links provided.

I have accumulated a list of all the things I was too stubborn at first to learn, but then after I actually took the time to learn it, my whole crochet game changed. I’d like to invite you to give some of these things a chance, especially if you have never tried them before. Some of these tips/tricks take a lot of practice to “master”, so don’t give up if you can’t get it with the first couple of tries! You will get it eventually, I have faith in you. ???? Also, I just want to point out, I do know that just because these techniques work better for me does not mean they will work better for you. I will never tell you my way is the right way and your way is wrong. Every crocheter is different! We each have our own ways of doing things and our own unique crochet styles, that is one of the reasons I love Crochet so much!

Ergonomic Crochet Hooks
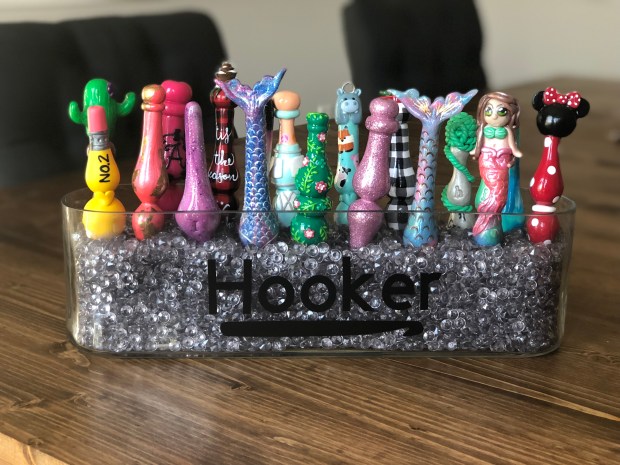
If you follow me on Instagram, it’s no secret how much I love my handmade polymer clay crochet hooks! After I made the switch to ergonomic hooks I never looked back! They are so much easier on my hands and wrists than regular hooks are, and they look super cute too! Not to mention I’m supporting other small shops (like mine) when I purchase one of these beauties.
Most hook makers offer curvy styled and slim styled hooks. I personally like the big fat curvy hooks, the bigger the better! You could play around with both designs and see which one you like better. They do take a little getting used to, just keep practicing with one until you get the hang of it and I bet you will LOVE IT! I haven’t had anyone message me yet saying they didn’t like ergonomic hooks after trying them.

All my favorite hook makers are over on Etsy! Here are some links to their shops, but also follow them on Instagram because that is where the announce restocks, ready to ship hooks, specials etc.
Harper Baby Shop
Chloe Rebecca Boutique
Puka Pey Designs
Hook Ewe
Fox Jams Boutique
North Woods Hooks
HeartSprinkle
If you would like to see a post showcasing all my crochet hooks and which maker they came from, leave a comment on this post letting me know!
Magic Ring (or circle)- An adjustable starting round used for crochet amigurumi patterns, granny squares and other patterns that work in crochet rounds. (WikiHow)
This was one of the crochet techniques I put off for a long time. I was absolutely fine with chaining 3, joining them into a circle, and putting my stitches in the middle of the circle. That worked fine for me and I felt like there was no reason for me to change. Wrong. Once I figured out how to do the Magic Ring, and practiced it until my hands turned blue (not really) It became almost like second nature. I ALWAYS use the Magic Ring over chaining and joining now, even if the pattern suggests the chaining and joining method. In my opinion, it’s faster, cleaner and easier, once you get the hang of it! It does take practice though, figuring out how to hold it and crochet around it at the same time took me forever, but like I said, it’s totally worth it! I was looking through YouTube videos, trying to find a good one for this post, and there are a lot of different videos showing all the same thing but each one is explained a little differently! If this video by June Gilbank on YouTube doesn’t make sense to you just look around and you might find a different video that’s easier for you to understand!
Crocheting in the “Back Bump”

If you have any of my pillow or bag patterns you should have seen steps on how to crochet in the back bump of your chain. This was totally new to me a couple years ago. I saw where people were saying “it gives your work a nice finished look”, and again. I was like ” I think the way I do it has a nice finished look!” Wrong again lol. Crocheting in the Back Bump of your chain DOES give your crocheted piece a finished, uniform look. It’s also great when you are crocheting down both sides of your chain (like in my patterns) because then your work is very symmetrical and tight. I do know there’s a time and a place for everything, and not all patterns need to be made with the back bump technique. I’m just saying I like the look of it and its worth learning if you are not familiar with it, in my opinion.

I really like this video I found by Fiber Flux on YouTube. It is very informative and you can clearly see what she is doing.
Foundation Crochet
Ooo this technique is one of my FAVORITES! I don’t even remember when I first saw foundation crochet in action, I was probably just looking through YouTube videos or something. I immediately liked it because I thought “oh wow, that would save me so much time.” Usually, when I am designing a new pattern, I will chain however many I THINK will be enough, then come back down with my single crochets or half double crochets or whatever stitch I’m using at that moment. 9 times out of 10 my chain would be too short 🙁 It is more stretchy before you add the row of stitches and it’s hard for me to estimate how many chains I need to make to get the finished length I want. With foundation crochet, I can just single crochet until it fits! Way less trial and error!!
I really like how Future Girl Craft Blog explains Foundation Single Crochet in this video.
But you can also do Foundation Half Double Crochet and Foundation Double Crochet too!!
Tapestry Needle
This tip might be super obvious to some of you, but when I first started crocheting, I would “hide my tails” with my crochet hook instead of using a tapestry needle. One, I didn’t have a tapestry needle, and two, I didn’t know there was another option. This was another one of those game-changer moments where I didn’t even hesitate to try it out. Like most people I know who crochet, sewing in your ends is the worst! So I was all for any techniques that would make that job easier, faster or cleaner looking.

For those of you who don’t know, tapestry needles look like giant sewing needles. You can get dull ones or pointy ones (I prefer the pointy ones myself) and you can get them made from different materials too, like plastic or stainless steel. The eye is big enough for yarn to go through and then you literally sew your tails into the crochet stitches to hide them. I literally used to keep pulling my yarn out of the top of my project, then back down through the bottom, then back up through the top, over and over again with my crochet hook before I learned about tapestry needles!
When I sew in my loose ends now, I like to sew them into the body of the stitches (making sure it’s not showing on either side of my work) and make a few passes back over where I’ve previously been. That way I know it is all intertwined with itself and is super secure. If you don’t use a tapestry needle to sew in your loose ends, comment on this post and let me know the technique you use!
Here’s a nice video from Red Heart Yarns on YouTube

Single Crochet Invisible Decrease
When you make cute little amigurumi creatures do you have big ol’ gaps where your decreases are? This technique will fix that! I wasn’t hesitant to try the SC invisible decrease because one, it looked really simple, and two, as soon as I saw the finished product it created I was like shocked! It is sooo much cleaner than the way I was doing it before!
You basically just do a normal single crochet decrease but the trick is you do it in the front loops only, instead of under both loops like normal.
Insert your hook into the front loop of your first stitch, then twist your hook a little and go straight into the front loop of your next stitch, Yarn over and pull through the two loops you just made, Yarn over and pull through two. It’s super simple, and the look it creates is drastically cleaner than a traditional single crochet decrease, in my opinion.
Here is a video from Red Haired Amazona Crochets on YouTube, showing exactly how to do a Single Crochet Invisible Decrease.
OttLite Floor Lamp
I just bought this lamp last week and I already love it! I have been crocheting with poor lighting for over a year now and the second I turned on my OttLite the difference was astounding! I knew I needed a lamp but I had no idea what kind of lamp and I didn’t even know there was a lamp out there that is made specifically for creatives! Here is a picture showing you my same workspace, taken seconds apart, one with the OttLite and one without it.

According to my friends over on Instagram, you can get Ottlites at Joann’s, with a coupon, and get them at a pretty good deal. I was so desperate I just went straight to Amazon and purchased one with m prime account so I could get it as soon as possible. I have linked the exact lamp I bought here (affiliate link). If this specific lamp isn’t in your budget at the moment OttLite has a bunch of different options like this desk lamp.
My eyes are so thankful and I can work more efficiently now that I can actually see what I am doing. I have also found other uses for the Ottlite,???? it makes a perfect impromptu iPhone tripod for filming your workspace! If you are currently working in poor lighting do your eyes a favor and invest in some lighting source to take the edge off, you only get one pair of eyes in a lifetime.????
MAGIC FASTEN OFF
The last game-changing crochet technique I am going to share with you guys, on this post, is how to close off small holes, like in amigurumi. I use this technique every time I make a bottom-up beanie (like my closed Claire Bun Beanie or Juliet Bun Beanie), to close the hole at the top so it’s very clean and uniform. This was also a technique I was open to trying because it looked super easy, and I really liked how the finished product turned out. As I have been researching this technique, trying to find a good video for you guys, I have learned there are a couple ways of doing this. This is how I do it. Thread your tail onto your tapestry needle, then insert your needle into the front loop of the first single crochet closest to where you just tied off, then loosely pull your tail through. Insert your needle into the front loop of the next single crochet and loosely pull your tail through. Continue around with all single crochet stitches, then when you get back to the beginning pull your yarn tight so the hole closes completely. Sew in your tail and your all set! Here is a video showing you how to do what I just described 😀 Just skip to the 9:50 time point in the video 🙂
Well, that’s it folks! A few of the crochet techniques that were serious game changers for me and took my crocheting to the next level. I hope you learned something you didn’t know before you came.❤ If you guys like this post let me know in the comments and I will try to do a part two! Also, if you’re not already, be sure to subscribe to my blog and be the first to know when I post something new (including free crochet patterns!) and head on over to my Instagram if you want to see some behind the scenes action, new pattern releases and just the crazy stuff I post daily in my stories.
➰Happy Crocheting➰
Ashley