Learn how to make a fabulous pom pom crown and look like a pom pom QUEEN at your next party, sports event or craft market.
I am so excited to have teamed up with Clover USA and bring you guys this epic pom pom crown tutorial.

This post may contain affiliate links, meaning I may recieve a small commission from purchases made at no extra cost to you.
You may be thinking, why would I need a pom pom crown? I think the better question is why WOULDN’T you need a pom pom crown??
You could make one in team colors and wear it to sporting events. You could make one to match your child’s birthday party them and be the most fabulous Pinterest mom ever! You could even wear it to your next craft festival or market to help attract people into your both and for a conversation starter!
It would also be a super cute photography prop for a cake smash or baby’s first birthday photoshoot.
The possibilities are endless!

These DIY pom pom crowns are super easy to make, use very little materials and add a lot of pizazz and personality to any outfit!
Big thank you to my friends over at Clover for providing me with the materials to make this tutorial.
You can watch the whole tutorial below if you prefer video to written instructions (or if you’re trying to crochet while you make it which I completely get)
If you don’t see the video player and are using an ad-blocker, you will need to pause the ad-blocker in order for the video player to show up.
Here’s what you will need to make your own DIY pom pom crown.

Materials
– Yarn- You can use any yarn you’d like! I will be using worsted weight yarn for my crown. If you need help coming up with color combos this post from The Crafty Fox Crochet is excellent!
– Clover Pom Pom Maker Set
– Crochet Hook
– Sharp Scissors
– Tapestry Needle
– Unicorn Yarn Bowl (optional)

DIY Pom Pom Crown
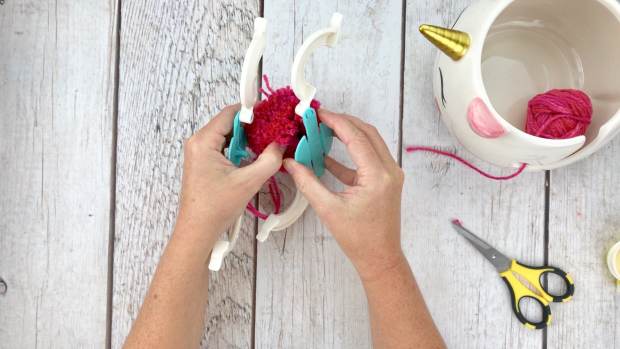
Using your 65mm Clover Pom Pom Maker and the yarn of your choice, open the pom maker arm and begin wrapping your yarn around the arm.

I like to count how many passes I do on each arm so both sides of the pom will be pretty even.
Once you fill-up the first arm of your pom maker, close that arm back in and start wrapping your yarn around the second arm of the pom maker.

After you’ve completed the same number of passes on the second arm as you did on the first arm. Cut your yarn.
Using your sharp scissors, run your scissors along the pom maker, between the two sections, and cut apart all the yarn you just wrapped. Do this around both arms.


Cut a piece of yarn (10-12 inches) in the same color as your pom pom.
Wrap the yarn around where you just cut the pompom, and pull it into the inside of the pom maker so it is hugging around the yarn.
Tie a knot as secure as you can. I like to knot on one side of the pom, then wrap my yarn to the other side and knot it again.

Pull apart the two body pieces to the pom pom maker and release your yarn pom.
Hold onto the tails created when you tied your knot, and give your pom pom a good shake.

Using your extra sharp scissors, trim any straggly bits of your pom. Be careful with this part, it’s easy to get carried away then you will have a bald pom pom.

Repeat the steps until you have 4 big poms and 5 smaller poms.
After you make all your poms, line them up in the order you would like for them to go on your finished pom pom crown.

Now let’s make the headband portion.
Using your crochet hook and any color of yarn, chain a length that’s long enough to fit around your head and tie in a bow.
For reference, I chained 125 and my whole chain was about 43 inches long (unstretched). I have a 21.5″ – 22″ head.

After your chain is long enough, cut your yarn and tie off.
Thread the end of your chain onto your tapestry needle.
Grab your first pom, and feel for where all the yarn in clinched together in the middle of your pom.

Push your tapestry needle (attached to your chain) into the center of the clinch, and thread on your pom pom.
Continue threading the rest of your pom poms on your chain.

After all your poms are on your chain headband, you can trim off the tails that were made when you tied the poms together.
I like to trim mine so they are about the same size as the yarn around them and blend right in.

That’s all there is to it! Now you have a super festive Crafty Pom Crown to wear to your next party, event or craft fair!
If you want to see how I put my Crafty Pom Crown on, skip to the end of the video at the beginning of this post. I, quite awkwardly, show how I wear them there ????.

I hope you guys love this tutorial and feel like a queen when you rock your festive Crafty Pom Crown! If you share any pictures be sure to tag me @ACraftyConcept on Instagram or #CraftyPomCrown so I can see what color combos yall came up with!

Happy Pom Makin’
❤️Ashley